Sep 25, 2014

Hari

I finally took some photos of Hari that I'd finished in... July, says my Ravelry project page! I "suppose" I wove in ends at that date, but I had some problems at blocking (and a busy summer to buy our house!)

Where should I begin?
I used for this project Sock from Madelintosh which has less yardage than Tosh Merino Light used in the pattern (and I almost used up the skein, just 30 cm/12" left, that's cool). Because of this and which can often happen with lace projects, my project was really short just after the knitting. I therefore decided to make it a cowl instead of a scarf.
Grafting finished, I first soaked the work, and let it dry on a towel like a pullover. All the spikes were flattened down, it looked like a simple lace cowl... Needless to say I was super disappointed.
Crossing my fingers, I redid the blocking, letting it dry in the shape of spikes. But it's the form of cowl, a large circle, that was hard to manage. Spikes are pointed on the inner side of circle, but flatter on the outer circle. I changed, how to say, the direction? when it was yet wet - inner side on outer side and outer side on inner side.
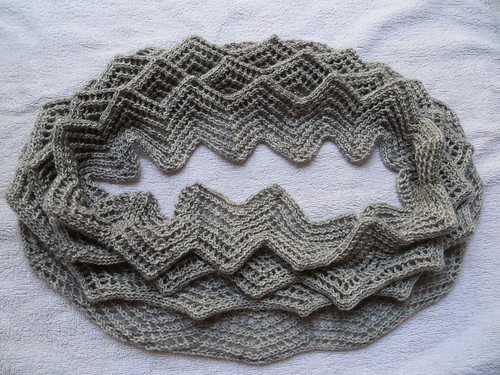
And it's worked!!

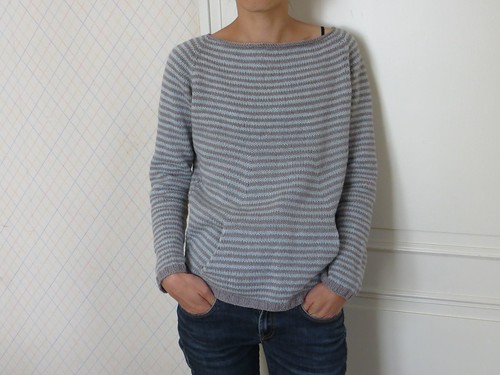
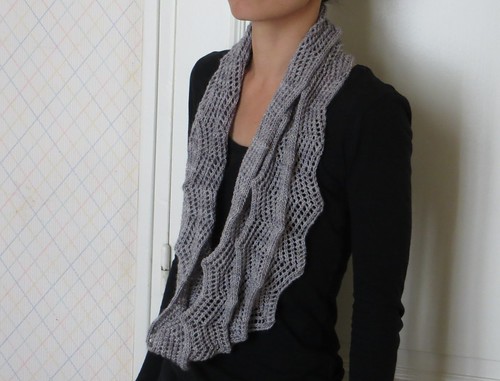
Here's the finished cowl, worn in single circle.

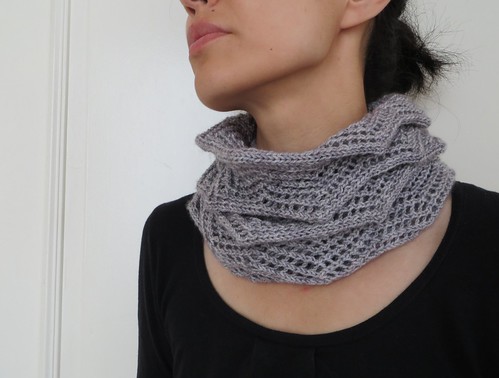
And doubled. I have a little preference for this way, we can see spikes more distinctly and it's easier to wear :)

Notes
Pattern: Hari by Olga Buraya-Kefelian
Yarn: Madelinetosh, Sock: Smokestack
Needle: 3.5 mm/US 4
Ravelry: Tension and Spikes

Sep 22, 2014

Japanese W&T

As promised in the second to last post, here's a tutorial of a new? short rows technique - mix of W&T and Japanese method.

On RS, as with W&T method, you knit to the turn-back point, slip one stitch, and bring your working yarn in front. I usually replace wrapped st on LN before turning work so as not to lose it.
Turn work and bring back working yarn in front (WS of work now). And - it's the crucial point - slip the first st with yarn in front (photo), instead of purling it.

On the photo, I purled the second st.

And you resolve the gap as W&T method: on RS, you work to wrapped st (photo) and lifting wrap with RN tip, knit together with the st.


Here's the result from WS. Wrap is longer with this technique; yarn goes across slipped sts.


On WS, you proceed as on RS.
You purl to the turn-back point, slip one stitch on RN and bring your working yarn in back. Replace the st on LN, turn work, bring the yarn in back.
And slip the first st wyib (photo).

Here, I knitted the second st.

To resolve the gap, when you come back to wrapped st (photo), lift the wrap onto LN inserting RN tip into wrap from the bottom in back.
Purl the wrap and the st together. That's what you do with W&T!

The result from WS.


And what is striking is that you obtain the same result as Japanese method 2 (slipped st and yo). This is indeed totally logical because, instead of keeping turn loops on the needle with yo, we wrap it around sts. The result on RS is just as neat and what's more, you don't need to reverse YO and st to purl on WS :) Not bad, is it? We can call this way Japanese Wrap & Turn!

To be honnest, I have to add that this result on RS is the same as German short rows technique (or double st) - and conncecting loop on WS is nonexistent with German method, which provides even neater fabric.
But if you're used to W&T, this Japanese W&T is a good compromise!

Sep 12, 2014

Organic Shellseeker

Summer holidays finished, I finally had the time to take some photos of my Shellseeker done at the start of August.


I worked this pullover with an organic cotton-merino blend yarn, it's perfect for half-season as the French say, for Spring and Autumn. I already wore it in some chilly mornings we had in France in August.

The pattern is, as usual for Heidi's patterns, very well written. I like her mathematical way with stitch count given for each section, we're never lost in her patterns. I nevertheless didn't understand the Pocket instructions the first time I read them, and obviously I was not the only one considering the discussion in Heidi's group on Ravelry. I followed the advice given on the forum, that is "follow the instructions", and I've got a nice kangaroo pocket! I think it's a terminological problem, I'd have said Bottom of pocket instead of pocket lining.


Final word on the yarn: Balance from o-wool is organic (more details on this post), as Sweater from Spud and Chloƫ recommended in the pattern, but it's more affordable! My row gauge was just a wee bit off (28 rows instead of 27), I as a result lengthened the raglan by placing last 2 inc every 4 rnds. And that is the only mod I did :)

Notes
Pattern: Shellseeker by Heidi Kirrmaier
Yarn: O-wool, Balance: Talc & Opal
Needle: US 5 (3.75 mm)
On Ravelry: Douces rayures

Fine days are back in France, I'm knitting another striped but ligther pullover ;)

Related Posts Plugin for WordPress, Blogger...