Dec 8, 2015
I moved!
As the title says, I moved and this blog is no longer active.
My new one is here, it's all about knitting and you can see my posts, tutorials and designs, etc.
Please update your bookmark ;)

Mar 24, 2015
Symptom No.3: Lucky (me)
Here's the third and last report (for now) of Solenn fever.
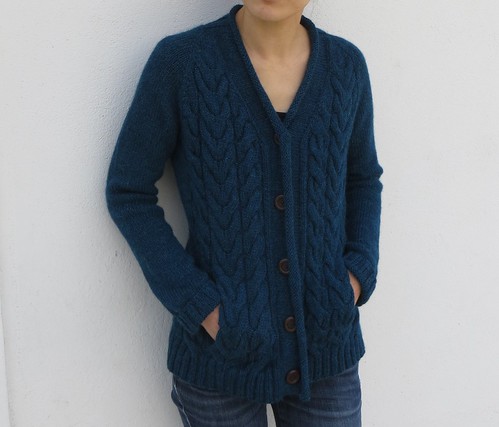
 This raglan cables jacket, named Lucky (me), is the pattern I'd wanted to knit for one year. I translated it into Japanese last year and it was a smash hit of my online store. And I loved knitting it! It's worked from the top down, you increase for raglan and fronts and incorporate as you go the cables (worked symmetrically). After the waist shaping, you make these pockets hidden in cables, it was really fun!

The details are really well thought too. At the very last row of cables, sts number is adjusted so that cables flow into ribbing. Two sides of pocket lining are knitted with the body, you just have one side to seam. Buttonband is worked in St st, but the back neck you don't sew buttons on is worked in ribbing to keep the edge from rolling up overmuch.
And I just followed literally the instructions, it's fuss-free!

I used Lima from Drops, a lighter version of Nepal that I used for Quadrature for Korrigan. As the latter, it's warm and cozy, slightly fluffy (and very reasonable). For the buttons, I chosen dark wooden ones that match this stylish simplicity of the jacket. They are from La droguerie.
We had some sunny, warm, springlike days in the northern half of France at the beginning of March, but it's gotten cold again, I'll have some chances to wrap myself up in this jacket, lucky me!
Project Data
Pattern: Lucky (me) by Solenn Couix-Loarer
Yarn: Drops LIMA: #701, appx 1230 m/1340 yds (Size M1)
Needles: 4.5 mm/ US 7 and 4 mm/ US 6
on Ravelry | in Japanese
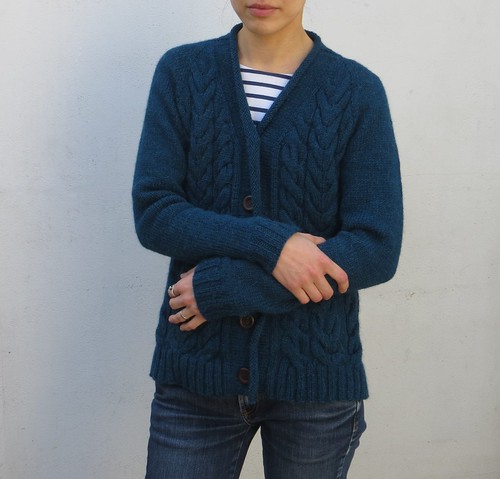
The details are really well thought too. At the very last row of cables, sts number is adjusted so that cables flow into ribbing. Two sides of pocket lining are knitted with the body, you just have one side to seam. Buttonband is worked in St st, but the back neck you don't sew buttons on is worked in ribbing to keep the edge from rolling up overmuch.
And I just followed literally the instructions, it's fuss-free!
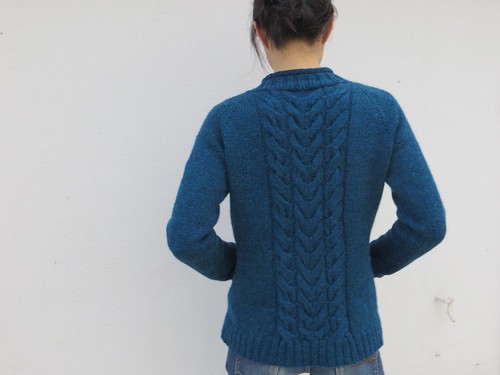
I used Lima from Drops, a lighter version of Nepal that I used for Quadrature for Korrigan. As the latter, it's warm and cozy, slightly fluffy (and very reasonable). For the buttons, I chosen dark wooden ones that match this stylish simplicity of the jacket. They are from La droguerie.
We had some sunny, warm, springlike days in the northern half of France at the beginning of March, but it's gotten cold again, I'll have some chances to wrap myself up in this jacket, lucky me!
Project Data
Pattern: Lucky (me) by Solenn Couix-Loarer
Yarn: Drops LIMA: #701, appx 1230 m/1340 yds (Size M1)
Needles: 4.5 mm/ US 7 and 4 mm/ US 6
on Ravelry | in Japanese
Feb 23, 2015
Symptom No.2: Quadrature for Korrigan
And here is the second report on Solenn fever.
This symptom named Quadrature for Korrigan keeps you warm and also keeps you from breaking away from the fever, especially when you'd already had precursors such as
 ,
,  and
and
 .
.
The Quadrature is a part of All Korrigan, which contains baby cardigan, girl cardigan, hat for all the family and this baby blanket, and whose hallmark is these beautiful decreasing cables.
We have no baby but I'd wanted to make this blanket for a long time, and here's why.

Isn't it lovely?
This project has two totally different phases. You begin with a few stitch from the center and work in the round in St st, increasing beside the axes as you go. This phase is perfect for TV knitting, while the final border demands more concentration with p rnds and cables (and increases). Needless to say it's rewarding and through the St st part, you're looking forward to working it.
I had some problems concerning the proportion to keep for this border.
This pattern offers a bonus version for adventurous knitters who want to make a larger blanket, work with other gauge and/or knit larger cables. As this blanket is for us, I'd bought 825 m/902 y of yarn (instead of 625 m for baby blanket) to make a larger one.
Well, the more you work in St st, the less proportion you need to keep for the border as the number of rnds is fixed (34 or 50 rnds). But when your yardage is limited, you need to find the point (=the proportion) to begin the border in order not to run short of yarn. I realized too late that I'd worked in St st more than I had to (7 balls of 11, more than 63%), whereas if I'd work larger cables, I needed to stop at 40% (60% for the border). I decided to work "normal" cables to unravel less portion, because I need about 50% for the border. I was afraid that the border would be too narrow compared to the St st part, but that's not the case, it's nice as it is (this is my personal opinion:) ).
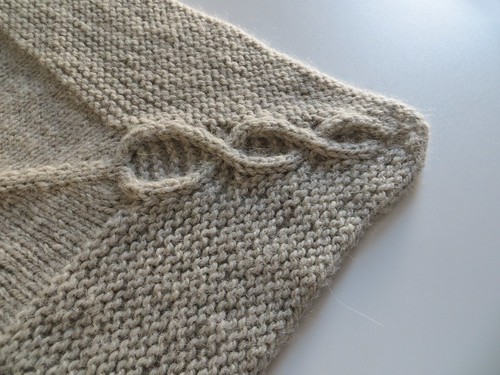
I've liked the yarn, Nepal from Drops (65% wool/35% alpaca, 75 m/50g ball). It's warm, soft, fluffy, very agreeable to work with and reasonable! I'm sure to use it for other projects.
To conclude, despite several unravellings (see my Ravelry page), I love the result!
Project data
Pattern: Quadrature for Korrigan by Solenn Couix-Loarer
Yarn: Drops, Nepal: #0500, 10.5 balls (787 m/861 y)
Needle: 5.5 mm / US 9
Gauge after blocking: 15.5 sts per 10 cm/4"
Notes: 93 sts between markers before the border part (I could have begun with 95 sts)
on Ravelry | in French | in Japanese
This symptom named Quadrature for Korrigan keeps you warm and also keeps you from breaking away from the fever, especially when you'd already had precursors such as
, and
.The Quadrature is a part of All Korrigan, which contains baby cardigan, girl cardigan, hat for all the family and this baby blanket, and whose hallmark is these beautiful decreasing cables.
We have no baby but I'd wanted to make this blanket for a long time, and here's why.
Isn't it lovely?
This project has two totally different phases. You begin with a few stitch from the center and work in the round in St st, increasing beside the axes as you go. This phase is perfect for TV knitting, while the final border demands more concentration with p rnds and cables (and increases). Needless to say it's rewarding and through the St st part, you're looking forward to working it.
I had some problems concerning the proportion to keep for this border.
This pattern offers a bonus version for adventurous knitters who want to make a larger blanket, work with other gauge and/or knit larger cables. As this blanket is for us, I'd bought 825 m/902 y of yarn (instead of 625 m for baby blanket) to make a larger one.
Well, the more you work in St st, the less proportion you need to keep for the border as the number of rnds is fixed (34 or 50 rnds). But when your yardage is limited, you need to find the point (=the proportion) to begin the border in order not to run short of yarn. I realized too late that I'd worked in St st more than I had to (7 balls of 11, more than 63%), whereas if I'd work larger cables, I needed to stop at 40% (60% for the border). I decided to work "normal" cables to unravel less portion, because I need about 50% for the border. I was afraid that the border would be too narrow compared to the St st part, but that's not the case, it's nice as it is (this is my personal opinion:) ).
I've liked the yarn, Nepal from Drops (65% wool/35% alpaca, 75 m/50g ball). It's warm, soft, fluffy, very agreeable to work with and reasonable! I'm sure to use it for other projects.
To conclude, despite several unravellings (see my Ravelry page), I love the result!
Project data
Pattern: Quadrature for Korrigan by Solenn Couix-Loarer
Yarn: Drops, Nepal: #0500, 10.5 balls (787 m/861 y)
Needle: 5.5 mm / US 9
Gauge after blocking: 15.5 sts per 10 cm/4"
Notes: 93 sts between markers before the border part (I could have begun with 95 sts)
on Ravelry | in French | in Japanese
Feb 13, 2015
Symptom No.1: Mademoiselle Lancelot
As promised, here's a report on the first symptom of Solenn fever.
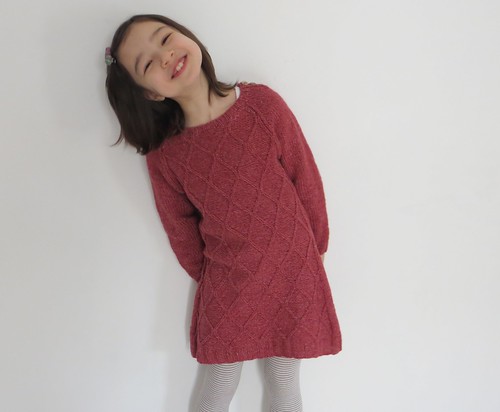
It's named Lancelot, after one of the Knights of the Round Table (please do NOT pronounce the "t"!), a pullover pattern for boys that I transformed in dress.
I don't claim the paternity of this idea: I'd seen a red and straight tunic project on Ravelry, knitted for a girl of 12 years old. But my daughter is only 7 and a half years old, and must be more active than a big girl. Hence the idea of making a dress with a flared skirt.
The pattern having a reputation of being cut small, I chose 8Y size. For the dimensions of the skirt, I was based on a dress found in a Phildar's catalog (8Y), and started with 152 sts (more sts than 12Y, the largest size) - that give me 80 cm /32" of circumference. After the hem, I decreased every 10 rnds at each side of the front panel and at 1 st from the side markers for back (- 4 sts each time). After dec til 128 sts, I increased once to have 132 sts (8Y) for waist shaping. That was also to easily follow instructions of raglan decrease.
I also modified the sleeves, beginning with less sts and increasing "evenly" to 8Y sts count - in the pattern, increases stop at the elbow.
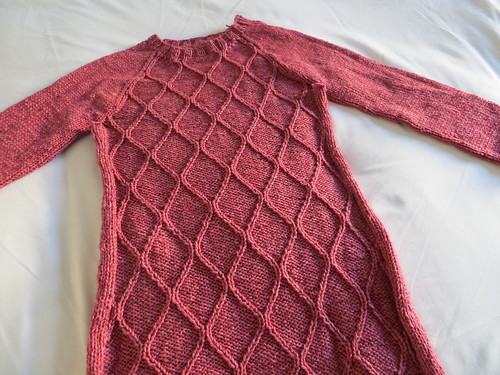
And here's the result!
 My daughter can run and/or dance!
I used Balance from o-wool, a cotton-wool blend yarn, because she's always complaining that it's hot and I was afraid she would never wear it if it's 100% wool. The balance is just perfect, neither too hot nor too cool, and this yarn is organic!
I just regret that it's a little too short and it cannot be worn as a dress next year. The sleeves are a little too large as this pattern is designed for boys. I'll certainly adjust it next year.
The last words on the pattern, that is very clearly written (in French), and the front panel motif is very addictive, simple, efficient and easier than it looks like (just 2 sts to cross!). I add that I used about 625 m - euh, 683 yards, thanks Ravelry -, instead of 600 m for 8Y size pullover.
Notes
Pattern: Lancelot by Solenn Couix-Loarer (heavily modified)
Size: 8Y (length to underarm: 44.5 cm/ 17.5", skirt length: 32.5 cm/12.5")
Yarn: O-Wool, Balance: Ruby (625 m / 683 y)
Needles: US 5 (3.75 mm) & US 6 (4 mm)
Ravelry project page | Blog post in French
It's named Lancelot, after one of the Knights of the Round Table (please do NOT pronounce the "t"!), a pullover pattern for boys that I transformed in dress.
I don't claim the paternity of this idea: I'd seen a red and straight tunic project on Ravelry, knitted for a girl of 12 years old. But my daughter is only 7 and a half years old, and must be more active than a big girl. Hence the idea of making a dress with a flared skirt.
The pattern having a reputation of being cut small, I chose 8Y size. For the dimensions of the skirt, I was based on a dress found in a Phildar's catalog (8Y), and started with 152 sts (more sts than 12Y, the largest size) - that give me 80 cm /32" of circumference. After the hem, I decreased every 10 rnds at each side of the front panel and at 1 st from the side markers for back (- 4 sts each time). After dec til 128 sts, I increased once to have 132 sts (8Y) for waist shaping. That was also to easily follow instructions of raglan decrease.
I also modified the sleeves, beginning with less sts and increasing "evenly" to 8Y sts count - in the pattern, increases stop at the elbow.
And here's the result!
I used Balance from o-wool, a cotton-wool blend yarn, because she's always complaining that it's hot and I was afraid she would never wear it if it's 100% wool. The balance is just perfect, neither too hot nor too cool, and this yarn is organic!
I just regret that it's a little too short and it cannot be worn as a dress next year. The sleeves are a little too large as this pattern is designed for boys. I'll certainly adjust it next year.
The last words on the pattern, that is very clearly written (in French), and the front panel motif is very addictive, simple, efficient and easier than it looks like (just 2 sts to cross!). I add that I used about 625 m - euh, 683 yards, thanks Ravelry -, instead of 600 m for 8Y size pullover.
Notes
Pattern: Lancelot by Solenn Couix-Loarer (heavily modified)
Size: 8Y (length to underarm: 44.5 cm/ 17.5", skirt length: 32.5 cm/12.5")
Yarn: O-Wool, Balance: Ruby (625 m / 683 y)
Needles: US 5 (3.75 mm) & US 6 (4 mm)
Ravelry project page | Blog post in French
Feb 10, 2015
Solenn Fever
It's a new disease, I'd had some precursors here and there for a few years, but it broke out a couple of months ago.
Symptom No.1: Lancelot
Symptom No.2: Quadrature for Korrigan

Symptom No.3: Lucky (me)
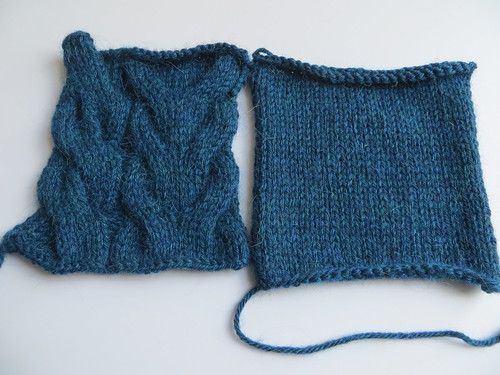
The last one is very recent, as for the two first, they've come to end. I'm reporting them shortly.
Symptom No.1: Lancelot
Symptom No.2: Quadrature for Korrigan
Symptom No.3: Lucky (me)
The last one is very recent, as for the two first, they've come to end. I'm reporting them shortly.
Sep 25, 2014
Hari
I finally took some photos of Hari that I'd finished in... July, says my Ravelry project page! I "suppose" I wove in ends at that date, but I had some problems at blocking (and a busy summer to buy our house!)
Where should I begin?
I used for this project Sock from Madelintosh which has less yardage than Tosh Merino Light used in the pattern (and I almost used up the skein, just 30 cm/12" left, that's cool). Because of this and which can often happen with lace projects, my project was really short just after the knitting. I therefore decided to make it a cowl instead of a scarf.
Grafting finished, I first soaked the work, and let it dry on a towel like a pullover. All the spikes were flattened down, it looked like a simple lace cowl... Needless to say I was super disappointed.
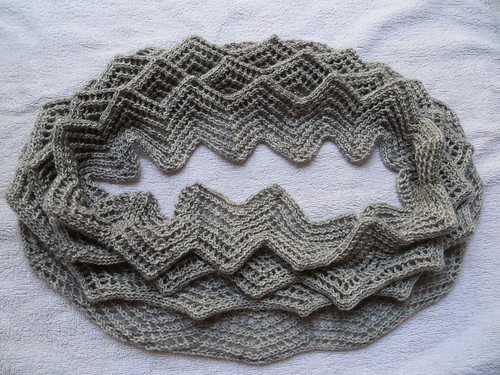
Crossing my fingers, I redid the blocking, letting it dry in the shape of spikes. But it's the form of cowl, a large circle, that was hard to manage. Spikes are pointed on the inner side of circle, but flatter on the outer circle. I changed, how to say, the direction? when it was yet wet - inner side on outer side and outer side on inner side.

And it's worked!!
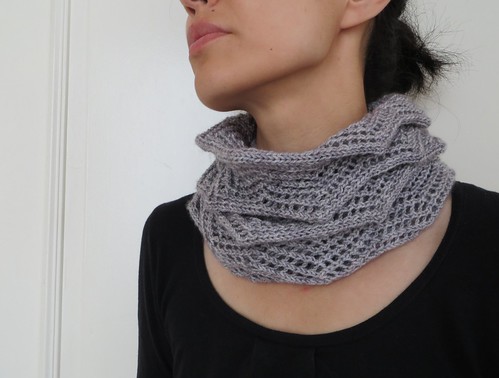
Here's the finished cowl, worn in single circle.

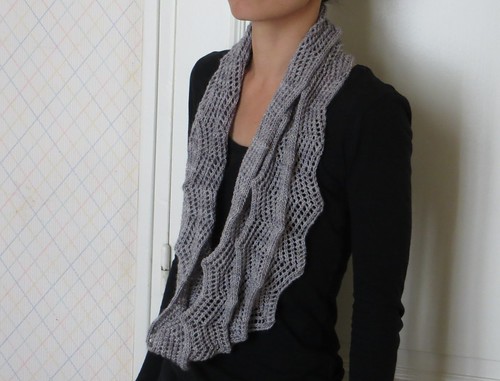
And doubled. I have a little preference for this way, we can see spikes more distinctly and it's easier to wear :)

Notes
Pattern: Hari by Olga Buraya-Kefelian
Yarn: Madelinetosh, Sock: Smokestack
Needle: 3.5 mm/US 4
Ravelry: Tension and Spikes
Where should I begin?
I used for this project Sock from Madelintosh which has less yardage than Tosh Merino Light used in the pattern (and I almost used up the skein, just 30 cm/12" left, that's cool). Because of this and which can often happen with lace projects, my project was really short just after the knitting. I therefore decided to make it a cowl instead of a scarf.
Grafting finished, I first soaked the work, and let it dry on a towel like a pullover. All the spikes were flattened down, it looked like a simple lace cowl... Needless to say I was super disappointed.
Crossing my fingers, I redid the blocking, letting it dry in the shape of spikes. But it's the form of cowl, a large circle, that was hard to manage. Spikes are pointed on the inner side of circle, but flatter on the outer circle. I changed, how to say, the direction? when it was yet wet - inner side on outer side and outer side on inner side.
And it's worked!!
Here's the finished cowl, worn in single circle.
And doubled. I have a little preference for this way, we can see spikes more distinctly and it's easier to wear :)
Notes
Pattern: Hari by Olga Buraya-Kefelian
Yarn: Madelinetosh, Sock: Smokestack
Needle: 3.5 mm/US 4
Ravelry: Tension and Spikes
Sep 22, 2014
Japanese W&T
As promised in the second to last post, here's a tutorial of a new? short rows technique - mix of W&T and Japanese method.
On RS, as with W&T method, you knit to the turn-back point, slip one stitch, and bring your working yarn in front. I usually replace wrapped st on LN before turning work so as not to lose it.
Turn work and bring back working yarn in front (WS of work now). And - it's the crucial point - slip the first st with yarn in front (photo), instead of purling it.

On the photo, I purled the second st.
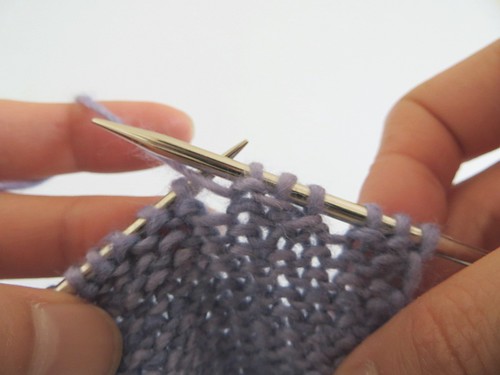
And you resolve the gap as W&T method: on RS, you work to wrapped st (photo) and lifting wrap with RN tip, knit together with the st.
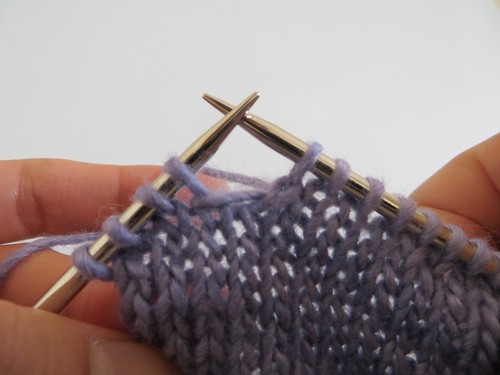
Here's the result from WS. Wrap is longer with this technique; yarn goes across slipped sts.

On WS, you proceed as on RS.
You purl to the turn-back point, slip one stitch on RN and bring your working yarn in back. Replace the st on LN, turn work, bring the yarn in back.
And slip the first st wyib (photo).
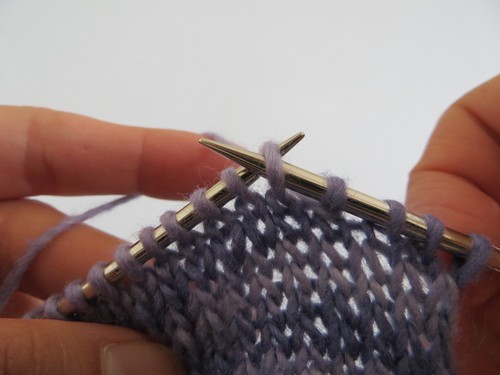
Here, I knitted the second st.

To resolve the gap, when you come back to wrapped st (photo), lift the wrap onto LN inserting RN tip into wrap from the bottom in back.
Purl the wrap and the st together. That's what you do with W&T!
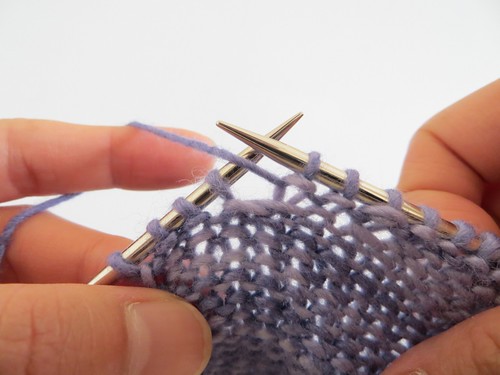
The result from WS.

And what is striking is that you obtain the same result as Japanese method 2 (slipped st and yo). This is indeed totally logical because, instead of keeping turn loops on the needle with yo, we wrap it around sts. The result on RS is just as neat and what's more, you don't need to reverse YO and st to purl on WS :) Not bad, is it? We can call this way Japanese Wrap & Turn!

To be honnest, I have to add that this result on RS is the same as German short rows technique (or double st) - and conncecting loop on WS is nonexistent with German method, which provides even neater fabric.
But if you're used to W&T, this Japanese W&T is a good compromise!
On RS, as with W&T method, you knit to the turn-back point, slip one stitch, and bring your working yarn in front. I usually replace wrapped st on LN before turning work so as not to lose it.
Turn work and bring back working yarn in front (WS of work now). And - it's the crucial point - slip the first st with yarn in front (photo), instead of purling it.
On the photo, I purled the second st.
And you resolve the gap as W&T method: on RS, you work to wrapped st (photo) and lifting wrap with RN tip, knit together with the st.
Here's the result from WS. Wrap is longer with this technique; yarn goes across slipped sts.
On WS, you proceed as on RS.
You purl to the turn-back point, slip one stitch on RN and bring your working yarn in back. Replace the st on LN, turn work, bring the yarn in back.
And slip the first st wyib (photo).
Here, I knitted the second st.
To resolve the gap, when you come back to wrapped st (photo), lift the wrap onto LN inserting RN tip into wrap from the bottom in back.
Purl the wrap and the st together. That's what you do with W&T!
The result from WS.
And what is striking is that you obtain the same result as Japanese method 2 (slipped st and yo). This is indeed totally logical because, instead of keeping turn loops on the needle with yo, we wrap it around sts. The result on RS is just as neat and what's more, you don't need to reverse YO and st to purl on WS :) Not bad, is it? We can call this way Japanese Wrap & Turn!
To be honnest, I have to add that this result on RS is the same as German short rows technique (or double st) - and conncecting loop on WS is nonexistent with German method, which provides even neater fabric.
But if you're used to W&T, this Japanese W&T is a good compromise!
Sep 12, 2014
Organic Shellseeker
Summer holidays finished, I finally had the time to take some photos of my Shellseeker done at the start of August.
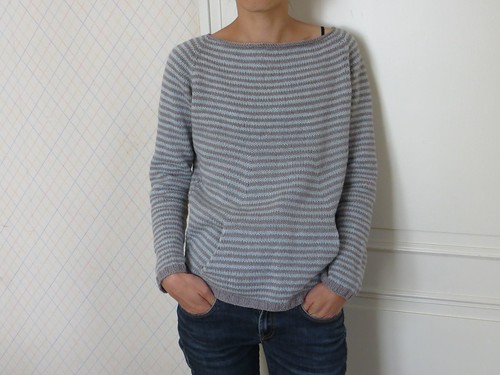
I worked this pullover with an organic cotton-merino blend yarn, it's perfect for half-season as the French say, for Spring and Autumn. I already wore it in some chilly mornings we had in France in August.
The pattern is, as usual for Heidi's patterns, very well written. I like her mathematical way with stitch count given for each section, we're never lost in her patterns. I nevertheless didn't understand the Pocket instructions the first time I read them, and obviously I was not the only one considering the discussion in Heidi's group on Ravelry. I followed the advice given on the forum, that is "follow the instructions", and I've got a nice kangaroo pocket! I think it's a terminological problem, I'd have said Bottom of pocket instead of pocket lining.
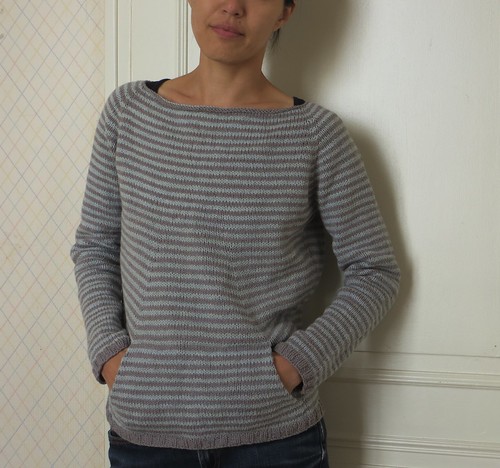
Final word on the yarn: Balance from o-wool is organic (more details on this post), as Sweater from Spud and Chloë recommended in the pattern, but it's more affordable! My row gauge was just a wee bit off (28 rows instead of 27), I as a result lengthened the raglan by placing last 2 inc every 4 rnds. And that is the only mod I did :)
Notes
Pattern: Shellseeker by Heidi Kirrmaier
Yarn: O-wool, Balance: Talc & Opal
Needle: US 5 (3.75 mm)
On Ravelry: Douces rayures
Fine days are back in France, I'm knitting another striped but ligther pullover ;)

I worked this pullover with an organic cotton-merino blend yarn, it's perfect for half-season as the French say, for Spring and Autumn. I already wore it in some chilly mornings we had in France in August.
The pattern is, as usual for Heidi's patterns, very well written. I like her mathematical way with stitch count given for each section, we're never lost in her patterns. I nevertheless didn't understand the Pocket instructions the first time I read them, and obviously I was not the only one considering the discussion in Heidi's group on Ravelry. I followed the advice given on the forum, that is "follow the instructions", and I've got a nice kangaroo pocket! I think it's a terminological problem, I'd have said Bottom of pocket instead of pocket lining.
Notes
Pattern: Shellseeker by Heidi Kirrmaier
Yarn: O-wool, Balance: Talc & Opal
Needle: US 5 (3.75 mm)
On Ravelry: Douces rayures
Fine days are back in France, I'm knitting another striped but ligther pullover ;)
Aug 23, 2014
Japanese Short Rows?
This post was originally posted in my French blog.
I was recently in Short Rows Period: my WIPs, discovery of a new method, discussion on Twitter about the best way to wrap sts of W&T, that has given me food for thought.
Here's a little comparative study of different techniques. It's pretty long!
My default method was W&T. As this method is frequently employed in English patterns, I was used to this technique.
But you know, I'm Japanese, I compared it to Japanese methods. Yes, methods in the plural, because there are two.
You've perhaps heard of “the Japanese Short Rows method”, that only uses a slipped st at each turn. This technique only requires split markers (or safety pins, paper clips…) that you put on working yarn to mark the connecting loop. When you get back, you will lift it to resolve the gaps.
Another Japanese method uses YO and slipped st. It's the method Japanese knitters learn first as it's considered easier than "the Japanese Short Rows method". In brief, you make a YO at each turn, turn work and slip the first st of next row.
The thing those two methods have in common is "slipped st" at turns, which results in one less row than W&T method.
Here's the difference expressed in chart:
Grey cells indicate what you do (wrap in W&T, yo and slipped st in Japanese methods) and will disappear from RS once you resolve short rows. What we can see with the charts is that the "slope" is smoother with Japanese methods.
With a real yarn, you get this result:
On this picture, the sts just below short rows are marked with pins: from left to right, Japanese method with yo (method 2), "the" Japanese method (method 1) and W&T. And the row where short rows' gap is resolved is in darker blue. We can see that there are 3 rows between pinned row and dark row with W&T and only 2 rows with Japanese methods.
Then, Japanese methods are superior to W&T? The answer is yes and no.
Yes because the result is neater as I've demonstrated so far. And No because of the "handiness" of W&T: with the method 1, you need split markers or any other similar tool in your hands whereas you just need your needles and working yarn with W&T. As for the method 2, when resolving short rows, you simply knit the YO and the next st together on RS, but on WS, you have to reverse the YO and the next stitch before purling them together – yes, I'm slacker.
Then, what happens when you mix W&T and Japanese methods? That will be the subject of the next post!
I was recently in Short Rows Period: my WIPs, discovery of a new method, discussion on Twitter about the best way to wrap sts of W&T, that has given me food for thought.
Here's a little comparative study of different techniques. It's pretty long!
My default method was W&T. As this method is frequently employed in English patterns, I was used to this technique.
But you know, I'm Japanese, I compared it to Japanese methods. Yes, methods in the plural, because there are two.
You've perhaps heard of “the Japanese Short Rows method”, that only uses a slipped st at each turn. This technique only requires split markers (or safety pins, paper clips…) that you put on working yarn to mark the connecting loop. When you get back, you will lift it to resolve the gaps.
Another Japanese method uses YO and slipped st. It's the method Japanese knitters learn first as it's considered easier than "the Japanese Short Rows method". In brief, you make a YO at each turn, turn work and slip the first st of next row.
The thing those two methods have in common is "slipped st" at turns, which results in one less row than W&T method.
Here's the difference expressed in chart:
| W&T | Japanese methods |

|

|
Grey cells indicate what you do (wrap in W&T, yo and slipped st in Japanese methods) and will disappear from RS once you resolve short rows. What we can see with the charts is that the "slope" is smoother with Japanese methods.
With a real yarn, you get this result:
 |
| Malabrigo, Silky Merino: London Sky! |
On this picture, the sts just below short rows are marked with pins: from left to right, Japanese method with yo (method 2), "the" Japanese method (method 1) and W&T. And the row where short rows' gap is resolved is in darker blue. We can see that there are 3 rows between pinned row and dark row with W&T and only 2 rows with Japanese methods.
Then, Japanese methods are superior to W&T? The answer is yes and no.
Yes because the result is neater as I've demonstrated so far. And No because of the "handiness" of W&T: with the method 1, you need split markers or any other similar tool in your hands whereas you just need your needles and working yarn with W&T. As for the method 2, when resolving short rows, you simply knit the YO and the next st together on RS, but on WS, you have to reverse the YO and the next stitch before purling them together – yes, I'm slacker.
Then, what happens when you mix W&T and Japanese methods? That will be the subject of the next post!
Aug 19, 2014
Tender Peerie Flooers
As promised, here's the photos of Peerie Flooers hat in action.
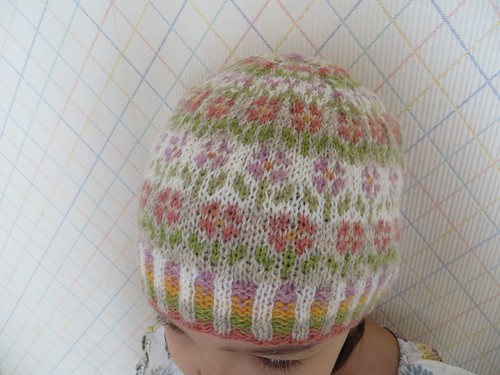
The Supersoft 100% Wool from Holst Garn has got very soft after washing: stitches have become denser and the roughness and itchiness of the yarn disappeared!
The pattern being for adult, the hat needed to be adjusted particularly in height. I started with S size, worked only 3 rows of flowers instead of 4, and rewrote the crown pattern, trying to get motifs that look like little flowers...
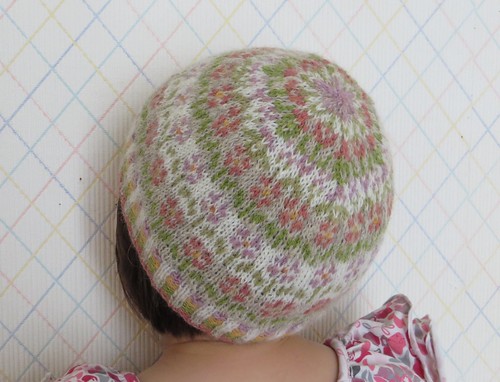
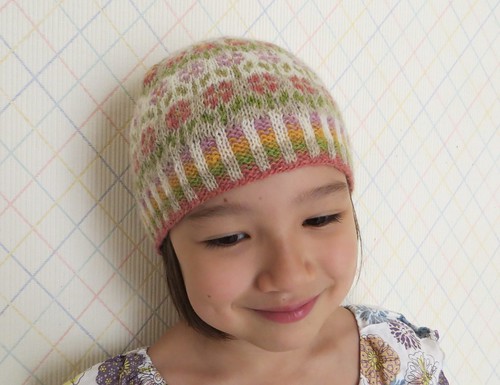
My daughter loves it, that's the main thing. Hope she'll wear it this winter!
Notes
Pattern: Peerie Flooers by Kate Davies
Yarn: Holst Garn, Supersoft 100% Uld: Persian Rose, Oatmeal, Calypso, Ecru, Sunrise, Sweet Pea, Verbena, Clementine
Needle: 3.25mm/US 3
Measurements: 47 cm circ x 19 cm depth before blocking, 49 cm circ x 18 cm depth after blocking
On Ravelry: Tender Peerie Flooers
The Supersoft 100% Wool from Holst Garn has got very soft after washing: stitches have become denser and the roughness and itchiness of the yarn disappeared!
The pattern being for adult, the hat needed to be adjusted particularly in height. I started with S size, worked only 3 rows of flowers instead of 4, and rewrote the crown pattern, trying to get motifs that look like little flowers...
My daughter loves it, that's the main thing. Hope she'll wear it this winter!
Notes
Pattern: Peerie Flooers by Kate Davies
Yarn: Holst Garn, Supersoft 100% Uld: Persian Rose, Oatmeal, Calypso, Ecru, Sunrise, Sweet Pea, Verbena, Clementine
Needle: 3.25mm/US 3
Measurements: 47 cm circ x 19 cm depth before blocking, 49 cm circ x 18 cm depth after blocking
On Ravelry: Tender Peerie Flooers
Aug 9, 2014
The most jogless stripes
Yeah, the title is oxymoronic, but that is what I experimented in my work.
I'm a stripes lover and don't like seaming. I naturally looked for techniques to work stripes in round. When knitting Paulie cardigan, I came across the TECHknitter's post on the stuff, but after several trials, I gave up knitting sleeves in round and I sewed them!
I recently began (and now finished!) knitting Sheelseeker by Heidi Kirrmaier with Balance from o-wool, a pullover pattern with 2 rnds stripes all over. I remembered that there was a "jogless" stripe technique in a hat pattern I'd translated, Brynja Beret by Hélène Magnússon. I tried it and it worked marvelously fine!
Here's how to proceed (only in text).
1. You work with Color A to the end of rnd (knit the last st).
2. Slip back the last st onto LN.
3. Knit the replaced st with color B, and continue with color B to the last st.
4. At the end of the (first) Color B rnd, with RN tip, lift the Color A st just below the Color B st (both worked in previous rnd) onto LN.
5. You have Color A st and Color B st on LN. Knit these 2 sts together. The Color B st is behind the Color A one and invisible from RS.
This technique is also explained with photos in Hélène's latest book, Icelandic Handknits: 25 Heirloom Techniques and Projects (if you love the Nordic style knitting, you'll find your happiness as French people say ;)).


I all the same show you the result with photo. The arrow shows the end of the rnd. Isn't it great!?

If you've never been satisfied with other techniques, try it!
I'm a stripes lover and don't like seaming. I naturally looked for techniques to work stripes in round. When knitting Paulie cardigan, I came across the TECHknitter's post on the stuff, but after several trials, I gave up knitting sleeves in round and I sewed them!
I recently began (and now finished!) knitting Sheelseeker by Heidi Kirrmaier with Balance from o-wool, a pullover pattern with 2 rnds stripes all over. I remembered that there was a "jogless" stripe technique in a hat pattern I'd translated, Brynja Beret by Hélène Magnússon. I tried it and it worked marvelously fine!
Here's how to proceed (only in text).
1. You work with Color A to the end of rnd (knit the last st).
2. Slip back the last st onto LN.
3. Knit the replaced st with color B, and continue with color B to the last st.
4. At the end of the (first) Color B rnd, with RN tip, lift the Color A st just below the Color B st (both worked in previous rnd) onto LN.
5. You have Color A st and Color B st on LN. Knit these 2 sts together. The Color B st is behind the Color A one and invisible from RS.
This technique is also explained with photos in Hélène's latest book, Icelandic Handknits: 25 Heirloom Techniques and Projects (if you love the Nordic style knitting, you'll find your happiness as French people say ;)).
I all the same show you the result with photo. The arrow shows the end of the rnd. Isn't it great!?
If you've never been satisfied with other techniques, try it!
Jul 25, 2014
Stranded knitting exercise
I'm a newbie in stranded knitting. I've already tried to work some motifs, but never knitted an entire project.
I'd wanted to knit a dotty cardigan for my daughter for a long time, and tried to knit a swatch with alpaca yarn, always from Drops. The result was pathetic!
.JPG)
I thought I seriously needed exercises and decided to restart a long-abandoned project: Peerie Flooers by Kate Davies. I'd immediately fallen in love with this pattern and tried swatches with leftovers from a scarf project (left). The result (right) was rather lovely, but I didn't start the project as I wanted something vivacious like the scarf.


More than two years have passed since then and I've got wise (?), I now appreciate this tender colour combination.
This project was a good exercise for my right forefinger: I usually knit in continental style, but I held contrasting color yarns in English style throughout this project! And to my surprise, I got a better result than the swatch with alpaca yarn.
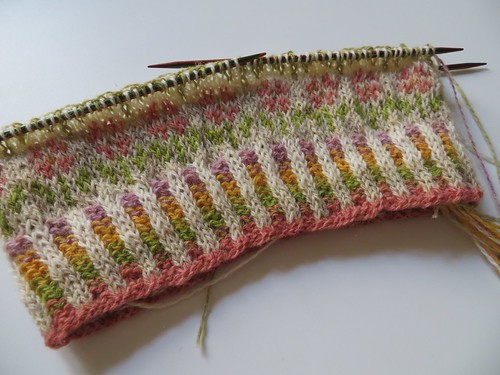
The yarn I used is Holst Garn Supersoft 100% Wool, that is somewhat rough before washing as you know. I think this roughness worked fine here: fibers of strands hold on, which keeps the fabric from puckering. I have to add that the English style made me knit with a looser tension.
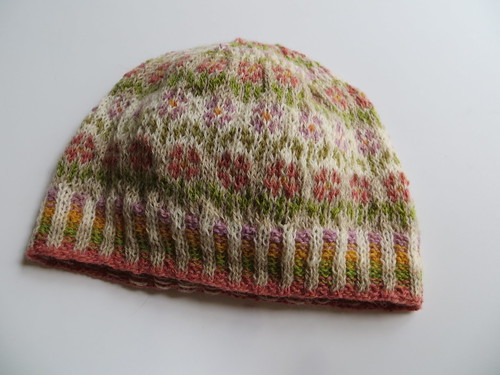
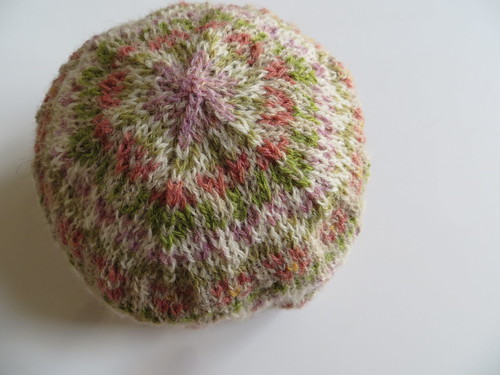
The two sizes of the pattern are for adults, the S size was too tall for my daughter despite less repeats (3 rows of flowers instead of 4). I shortened the hat by rewriting the crown, with free OpenOffice spreadsheet!
I'll post photos of the hat "in practice" soon!
.JPG)
I thought I seriously needed exercises and decided to restart a long-abandoned project: Peerie Flooers by Kate Davies. I'd immediately fallen in love with this pattern and tried swatches with leftovers from a scarf project (left). The result (right) was rather lovely, but I didn't start the project as I wanted something vivacious like the scarf.
More than two years have passed since then and I've got wise (?), I now appreciate this tender colour combination.
This project was a good exercise for my right forefinger: I usually knit in continental style, but I held contrasting color yarns in English style throughout this project! And to my surprise, I got a better result than the swatch with alpaca yarn.
The yarn I used is Holst Garn Supersoft 100% Wool, that is somewhat rough before washing as you know. I think this roughness worked fine here: fibers of strands hold on, which keeps the fabric from puckering. I have to add that the English style made me knit with a looser tension.
The two sizes of the pattern are for adults, the S size was too tall for my daughter despite less repeats (3 rows of flowers instead of 4). I shortened the hat by rewriting the crown, with free OpenOffice spreadsheet!
I'll post photos of the hat "in practice" soon!
Jun 19, 2014
Leticia
Today, I'm proud to share with you another pattern I've worked on, Leticia by Reiko Kuwamura.
The shawl is worked in a rather unusual way for a shawl, from the bottom up. You first knit the lacy border and pick up stitches along one edge, and the body is shaped with short rows. Its lacy aspect is created with no yo!
Leticia is an airy summer shawl that Reiko designed for Serena of Manos del Uruguay, carried on an online Japanese yarn store. The shawl is named after the artisan's name she fonund on the tag attached to the skeins she got.
 |
| ©Reiko Kuwamura |
The shawl is worked in a rather unusual way for a shawl, from the bottom up. You first knit the lacy border and pick up stitches along one edge, and the body is shaped with short rows. Its lacy aspect is created with no yo!
 |
| ©Reiko Kuwamura |
Hope you enjoy!
Jun 8, 2014
Alla
Technical editing has recently become one of my professional activities.
I love this job because I can take part in "pattern making", think with designers about ways to get instructions clear and easy to follow. And of course, for the privilege of previewing upcoming patterns;)
Today, I'm very happy and proud to introduce you Alla by Hélène Magnússon that I worked on this week!
Alla is a little lacy circular yoke cardigan, light as a feather. It's worked from the top down, with a lace weight yarn and different size needles to accentuate this flared shape. Hélène was inspired by the work of Aðalbjörg Jónsdóttir, an old Icelandic woman who had created beautiful lace dresses, when she was working on a book about her.
 The cardigan is very versatile, it can be worn dressed up or down. You can see many examples on Hélène's blog where you can participate to Pinterest giveaway.
The pattern is available on Ravlery or on Hélène's website, The Icelandic Knitter.
Now, I'm going to translate it into Japanese for my e-store ;)
I love this job because I can take part in "pattern making", think with designers about ways to get instructions clear and easy to follow. And of course, for the privilege of previewing upcoming patterns;)
Today, I'm very happy and proud to introduce you Alla by Hélène Magnússon that I worked on this week!
Alla is a little lacy circular yoke cardigan, light as a feather. It's worked from the top down, with a lace weight yarn and different size needles to accentuate this flared shape. Hélène was inspired by the work of Aðalbjörg Jónsdóttir, an old Icelandic woman who had created beautiful lace dresses, when she was working on a book about her.
The pattern is available on Ravlery or on Hélène's website, The Icelandic Knitter.
Now, I'm going to translate it into Japanese for my e-store ;)
Jun 5, 2014
Tension or Spikes?
In parallel with Shellseeker, I'm knitting Hari, designed by Olga Buraya-Kefelian.
I must say it's the most creative pattern I've ever knit!
I must say it's the most creative pattern I've ever knit!
Here it is.
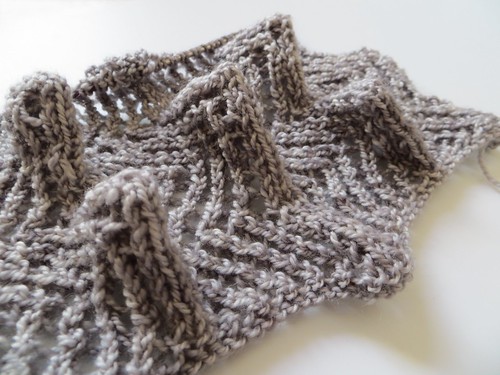
The pattern is simple, just with increase and decrease, and a simple alternation of their direction creates these spikes. Olga is amazingly clever!
The name of the pattern, Hari, actually means needle or spike in Japanese, as it's explained on Ravelry. But Japanese language has many homonyms, hari also means tension, a word that suits well to the design, doesn't it?
The yarn used for this scarf is Madelinetosh Sock, Smokestack.

The colorway had first seemed a little bit dark, metallicly cold and hard - was my impression influenced by the name? -, I'd for a long time hesitated to use it for a scarf project for fear of having a grey complexion ;).
It looks quite better knitted, I love the changing shades of light grey, Amy is really talented!
It looks quite better knitted, I love the changing shades of light grey, Amy is really talented!
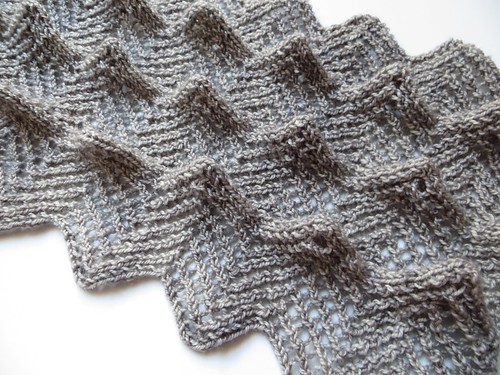
I'm in the final stretch, I hope I can post photos of the finished scarf shortly ;)
Subscribe to:
Posts (Atom)
