Showing posts with label tutorial. Show all posts

Sep 22, 2014

Japanese W&T

As promised in the second to last post, here's a tutorial of a new? short rows technique - mix of W&T and Japanese method.

On RS, as with W&T method, you knit to the turn-back point, slip one stitch, and bring your working yarn in front. I usually replace wrapped st on LN before turning work so as not to lose it.
Turn work and bring back working yarn in front (WS of work now). And - it's the crucial point - slip the first st with yarn in front (photo), instead of purling it.

On the photo, I purled the second st.
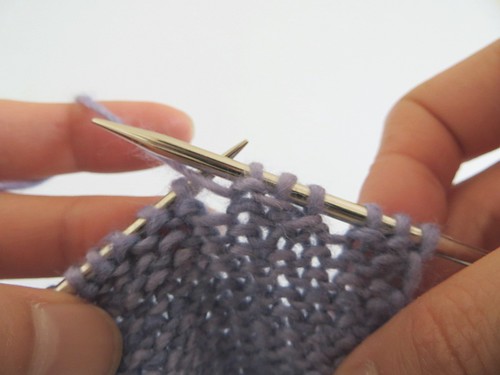
And you resolve the gap as W&T method: on RS, you work to wrapped st (photo) and lifting wrap with RN tip, knit together with the st.
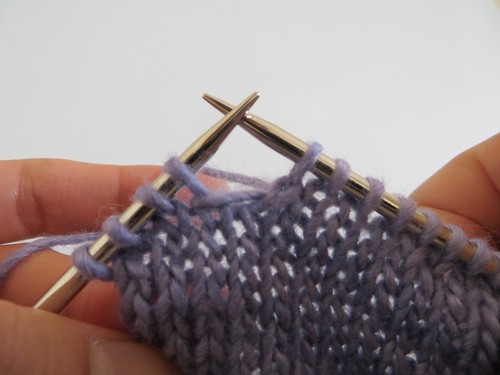

Here's the result from WS. Wrap is longer with this technique; yarn goes across slipped sts.


On WS, you proceed as on RS.
You purl to the turn-back point, slip one stitch on RN and bring your working yarn in back. Replace the st on LN, turn work, bring the yarn in back.
And slip the first st wyib (photo).
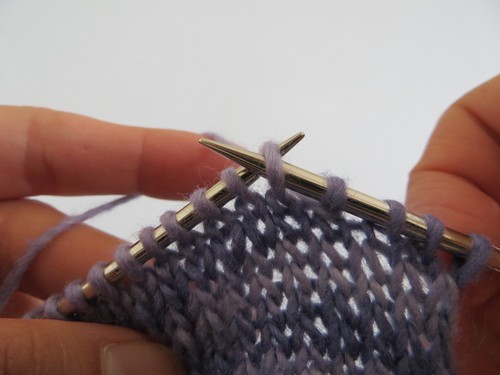
Here, I knitted the second st.

To resolve the gap, when you come back to wrapped st (photo), lift the wrap onto LN inserting RN tip into wrap from the bottom in back.
Purl the wrap and the st together. That's what you do with W&T!
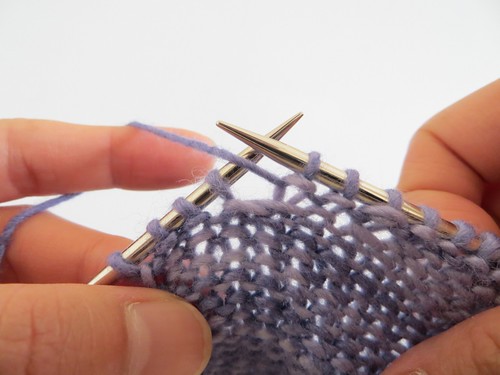
The result from WS.


And what is striking is that you obtain the same result as Japanese method 2 (slipped st and yo). This is indeed totally logical because, instead of keeping turn loops on the needle with yo, we wrap it around sts. The result on RS is just as neat and what's more, you don't need to reverse YO and st to purl on WS :) Not bad, is it? We can call this way Japanese Wrap & Turn!

To be honnest, I have to add that this result on RS is the same as German short rows technique (or double st) - and conncecting loop on WS is nonexistent with German method, which provides even neater fabric.
But if you're used to W&T, this Japanese W&T is a good compromise!

Aug 23, 2014

Japanese Short Rows?

This post was originally posted in my French blog.

I was recently in Short Rows Period: my WIPs, discovery of a new method, discussion on Twitter about the best way to wrap sts of W&T, that has given me food for thought.
Here's a little comparative study of different techniques. It's pretty long!

My default method was W&T. As this method is frequently employed in English patterns, I was used to this technique.
But you know, I'm Japanese, I compared it to Japanese methods. Yes, methods in the plural, because there are two.

You've perhaps heard of “the Japanese Short Rows method”, that only uses a slipped st at each turn. This technique only requires split markers (or safety pins, paper clips…) that you put on working yarn to mark the connecting loop. When you get back, you will lift it to resolve the gaps.

Another Japanese method uses YO and slipped st. It's the method Japanese knitters learn first as it's considered easier than "the Japanese Short Rows method". In brief, you make a YO at each turn, turn work and slip the first st of next row.

The thing those two methods have in common is "slipped st" at turns, which results in one less row than W&T method.
Here's the difference expressed in chart:

W&TJapanese methods

Grey cells indicate what you do (wrap in W&T, yo and slipped st in Japanese methods) and will disappear from RS once you resolve short rows. What we can see with the charts is that the "slope" is smoother with Japanese methods.

With a real yarn, you get this result:
Malabrigo, Silky Merino: London Sky!

On this picture, the sts just below short rows are marked with pins: from left to right, Japanese method with yo (method 2), "the" Japanese method (method 1) and W&T. And the row where short rows' gap is resolved is in darker blue. We can see that there are 3 rows between pinned row and dark row with W&T and only 2 rows with Japanese methods.

Then, Japanese methods are superior to W&T? The answer is yes and no.
Yes because the result is neater as I've demonstrated so far. And No because of the "handiness" of W&T: with the method 1, you need split markers or any other similar tool in your hands whereas you just need your needles and working yarn with W&T. As for the method 2, when resolving short rows, you simply knit the YO and the next st together on RS, but on WS, you have to reverse the YO and the next stitch before purling them together – yes, I'm slacker.

Then, what happens when you mix W&T and Japanese methods? That will be the subject of the next post!

Aug 9, 2014

The most jogless stripes

Yeah, the title is oxymoronic, but that is what I experimented in my work.

I'm a stripes lover and don't like seaming. I naturally looked for techniques to work stripes in round. When knitting Paulie cardigan, I came across the TECHknitter's post on the stuff, but after several trials, I gave up knitting sleeves in round and I sewed them!

I recently began (and now finished!) knitting Sheelseeker by Heidi Kirrmaier with Balance from o-wool, a pullover pattern with 2 rnds stripes all over. I remembered that there was a "jogless" stripe technique in a hat pattern I'd translated, Brynja Beret by Hélène Magnússon. I tried it and it worked marvelously fine!

Here's how to proceed (only in text).
1. You work with Color A to the end of rnd (knit the last st).
2. Slip back the last st onto LN.
3. Knit the replaced st with color B, and continue with color B to the last st.

4. At the end of the (first) Color B rnd, with RN tip, lift the Color A st just below the Color B st (both worked in previous rnd) onto LN.
5. You have Color A st and Color B st on LN. Knit these 2 sts together. The Color B st is behind the Color A one and invisible from RS.

This technique is also explained with photos in Hélène's latest book, Icelandic Handknits: 25 Heirloom Techniques and Projects (if you love the Nordic style knitting, you'll find your happiness as French people say ;)).


I all the same show you the result with photo. The arrow shows the end of the rnd. Isn't it great!?

If you've never been satisfied with other techniques, try it!
Related Posts Plugin for WordPress, Blogger...